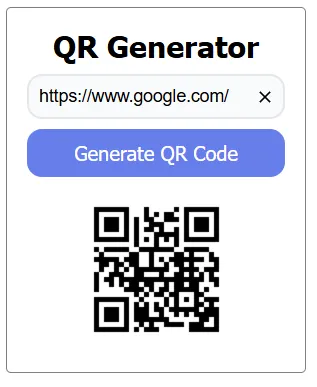
Now It time to make advance components, by create component for generate qr code
let’s go :)

Table of contents
Open Table of contents
Getting started
reference:
How To Create QR Codes With JavaScript
Hand Print Scanning Animation Effects | Html CSS
Let’s coding
HTML
<!DOCTYPE html>
<html lang="en">
  <head>
    <meta charset="UTF-8" />
    <meta name="viewport" content="width=device-width, initial-scale=1.0" />
    <title>QR Code Component</title>
  </head>
  <body>
    <qrcode-component></qrcode-component>
    <script type="module" src="qrcode-component.js"></script>
  </body>
</html>index.html
Script
export class QrCode extends HTMLElement {
  constructor() {
    super();
    this.attachShadow({ mode: "open" });
    this.QR_URL =
      "https://cdnjs.cloudflare.com/ajax/libs/qrcode/1.4.4/qrcode.js";
    this.FONT_URL =
      "https://fonts.googleapis.com/css2?family=Roboto:wght@400;700&display=swap";
  }

  connectedCallback() {
    this.loadQRCodeScript().then(() => {
      this.renderTemplate();
      this.onClickBtGenerate();
      this.onClickBtClear();
      this.input = this.shadowRoot.querySelector("#inputUrl");
      this.image = this.shadowRoot.querySelector("#qrCodeImage");
      this.boxResult = this.shadowRoot.querySelector(".qr-result");
    });
  }

  loadQRCodeScript() {
    return new Promise((resolve, reject) => {
      if (window.QRCode) return resolve();

      const script = document.createElement("script");
      script.src = this.QR_URL;
      script.onload = resolve;
      script.onerror = reject;
      document.head.appendChild(script);
    });
  }

  renderTemplate() {
    this.shadowRoot.innerHTML = `
       <link rel="stylesheet" href="qrcode-component.css">
         <style>
          @import url(${this.FONT_URL});
          div {
            font-family: 'Roboto', sans-serif;
          }
        </style>
        ${this.template().trim()}
     `;
  }

  template = () => {
    return `
     <div class="qr-box">
      <div class="qr-input">
        <h1>QR Generator</h1>
        <div class="inputs">
          <input type="text" id="inputUrl" placeholder="Please enter url" />
          <button type="button" class="bt-clear-input">
            <svg
              width="16"
              height="16"
              viewBox="0 0 24 24"
              fill="none"
              stroke="currentColor"
              stroke-width="2"
            >
              <line x1="18" y1="6" x2="6" y2="18"></line>
              <line x1="6" y1="6" x2="18" y2="18"></line>
            </svg>
          </button>
        </div>
        <button type="button" class="bt-generate">Generate QR Code</button>
      </div>
      <div class="qr-result">
        <img id="qrCodeImage" />
      </div>
    </div>
    `;
  };

  onClickBtGenerate() {
    this.shadowRoot
      .querySelector(".bt-generate")
      .addEventListener("click", async () => {
        let url = this.input.value;
        if (url === "") return;

        this.clearState();
        await this.delay(500);

        const dataUrl = await QRCode.toDataURL(url);
        this.render(dataUrl);
      });
  }

  onClickBtClear() {
    this.shadowRoot
      .querySelector(".bt-clear-input")
      .addEventListener("click", async () => {
        this.input.value = "";
      });
  }

  clearState = () => {
    this.image.src = "";
  };

  delay = ms => {
    return new Promise(resolve => setTimeout(resolve, ms));
  };

  render(dataUrl) {
    this.image.src = dataUrl;
  }
}

customElements.define("qrcode-component", QrCode);qrcode-component.js
Style
* {
  margin: 0;
  padding: 0;
  box-sizing: border-box;
}

button {
  all: unset;
  cursor: pointer;
}

input {
  width: 100%;
  padding: 8px 24px 8px 8px;
  border: 2px solid #e5e7eb;
  border-radius: 12px;
  font-size: 14px;
  transition: all 0.3s ease;
  background: #f9fafb;
}

.qr-box {
  max-width: 240px;
  padding: 16px;
  text-align: center;
  border: solid 1px gray;
  border-radius: 4px;

  & h1 {
    font-size: 24px;
  }

  .qr-input {
    display: flex;
    gap: 8px;
    flex-direction: column;
    margin-bottom: 8px;

    .inputs {
      position: relative;
    }

    .bt-clear-input {
      position: absolute;
      width: 16px;
      height: 16px;
      right: 8px;
      top: 10px;
      z-index: 1;
    }

    .bt-generate {
      height: 38px;
      background-color: #667eea;
      border-radius: 12px;
      color: #ffffff;
      line-height: 0;
    }
  }
  .qr-result {
    position: relative;
    width: 132px;
    height: 132px;
    margin: 0 auto;
    transition: all 0.3s;
    img {
      position: absolute;
      left: 0;
      top: 0;
      width: 100%;
      height: auto;
      z-index: 1;
    }
  }
}qrcode-component.css
Finally
Then,Put everything together. ;)
*Bonus, I add css animation for good UX, If you interest , can dowload following url ,thanks :)
Ok, Done for basic component ;)